

- Discussion:
- permits the guided insertion of a cannulated blade thru the nail and into the femoral head,at one of three angles to accommodate anatomic or fracture variations;
- angle options:
- key onto proximal nail end, adapting the nail slot to accept the spiral blade at oneof three chosen nail to blade angles: 100 deg, 110 deg, or 120 deg;
- 15 mm end cap for Spiral Blade Plate:
- securely locks locking sleeve to the nail;
- choice of 0 mm, 10 mm, and 20 mm sizes provide option to extend nail length, allowing opitimal positioning of the spiral blade, while ensuring access to the top of the nail for removal;
- Technique:
- hold ruler against the lateral aspect of the thigh and adjust tip of the ruler until it is flush with the proximal locking slot - mark the skin at this level;
- move the C arm to the distal femur, replace the proximal end of ruler at the skin mark and take an AP image of the distal femur, and read the nail length from distal epiphyseal scar;
- when using the spiral blade plate, select a nail entry point slightly more anterior than usual;
- as with the standard IM nailing techniques, drill over the guide wire with 13 mm cannulated drill bit, and drill to a minimum depth of 100 mmm;
- then, use the URFN Broach to enlarge the opening to greater than 15 mm, to accommodate the locking sleeve for spiral blade plate;
- verify fracture reduction and nail position radiographically;
- at this position, the proximal end of the nail may be below tip of the greater trochanter;
- if so, proximal end of the nail end can be extended up to 20 mm by adding a 15 mm end cap for the spiral blade to proximal end of the nail;
- insert guide wire and drill the outer cortex:
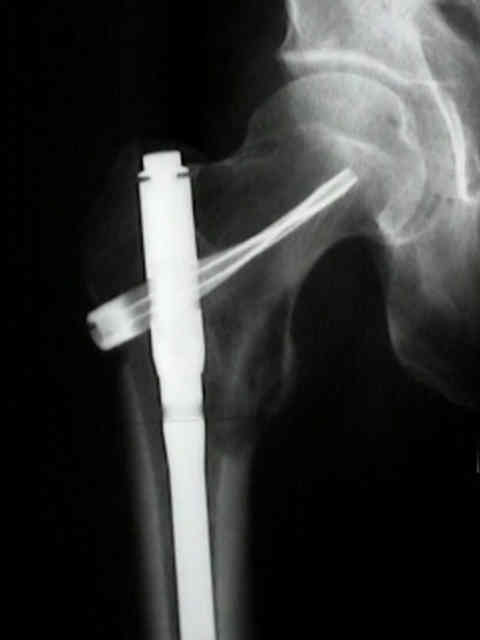
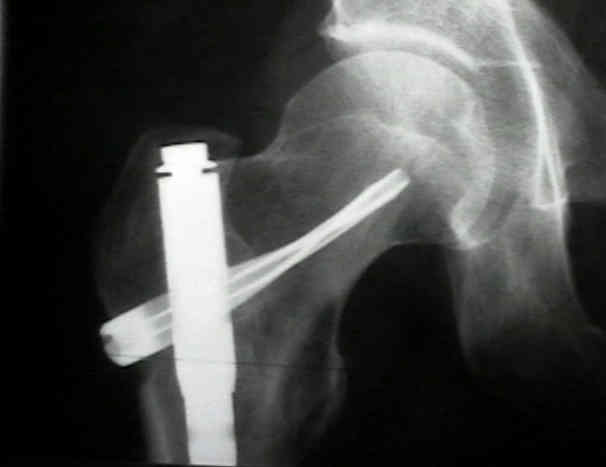
- spiral blade inserts into the femoral head over a precisely placed guide wire;
- wire is also a greater for reaming the lateral cortex to accommodate the hub of the spiral blade;
- insert 3.2 mm Calibrated Guide Wire in the femoral head & neck
- wire must be correctly placed to prevent penetration of spiral blade thru posterior aspect of femoral neck or head;
- couple 13.0 mm Cannulated Drill Bit to small air drill, and pass drill over the guide wire to open up the lateral cortex;
- shoulder of the drill bit will stop at protection sleeve;
- align the blade plate prior to insertion:
- nail must be in the correct degree of lateral rotation for the spiral blade plate to be inserted safely into the femoral neck;
- externally rotate the insertion handle until the slot is in line with the femoral neck axis, using the anteversion wire as a guide only;
- tip orients horizontally in the femoral head, providing wt bearing surface for rotational control and cutout resistance;
- blade orients axially within nail slot for bending strength at nail/blade interface;
- T handle is in the same plane as Spiral Blade Tip;
- provides an indicator of blade tip orientation during insertion into the femoral head;
- insert the blade plate:
- orient T handle parallel to axis of the femur and push spiral blade insertionassembly over the guide wire, thru cortical opening, and into nail slot;
- release the T handle at this time, to allow free rotation of blade during insertion;
- T handle will rotate counterclockwise during blade insertion;
- grip the blue handle of the inserter with one hand, and insert blade to the required depth using light blows of the hammer on the striking surface of the connencting screw;
- locking caps:
- use 15 mm end cap for spiral blade whenever spiral blade locking sleeve is used;
- 15 mm End Cap locks sleeve in place, & has polyethylene tip that helps prevent spiral blade from backing out of femoral head