
- See:
- OCS Application and Correction
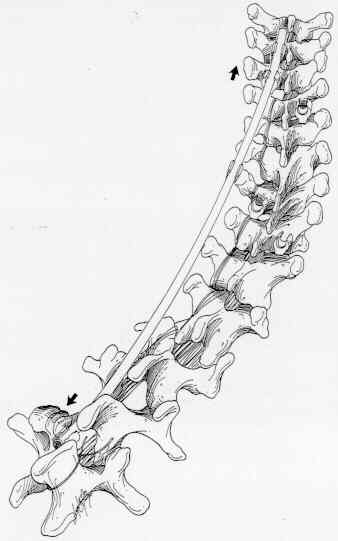
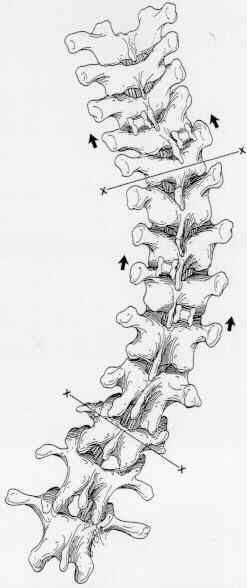
- Notes for Wrightlock Spinal Fixation System: Technique Overview: The typical hook placement for a Type III scoliotic curve of about 65 degrees (Figure 1) is derived from that recommended by Harrington. Normally, a six hook construct is used. Couplers are placed between the upper and middle sets of hooks and between the lower and middle sets of hooks. Cerclage wire is placed around the lower concave hook and that vertebrae's spinous process. This will protect against lumbar hook dislodgement as patients flex their trunks. A flexion-limiting claw construct on the cephalad end of the construct is normally not used (Figure 2). Concave Side Hook Placement: The two end hooks on the concave side serve as attachment sites for the OCS (tm) instrumentation which will provide the major corrective force. Place a bifid hook on the cephalad concave side one vertebral level above the end vertebra of the primary curve. Then place a down-going, narrow lamina hook either two levels below the bottom vertebra on the concave side or at least to L2. The philosophy is not to place down-going hooks in the thoracic spine and not to end a fusion at the thoracolumbar junction. Place the middle bifid hook on or close to the apical vertebra. This hook will provide for "apical translation" as well as serve as an additional tissue fixation site for the concave rod. Note: The L2 hook is not actually inserted under the lamina until securely fixed to the rod.
Convex Side Hook Placement: The hooks on the convex side should be staggered relative to those on the concave side. Using adjacent rather than the same vertebrae for fixation provides the maximum strength on the tissue side of the spinal instrumentation. At the caudal end of the convex side, place a down going, narrow laminar hook one level above the caudal concave side hook. Note: This hook is also fixed securely on the rod prior to insertion under the lamina. Place a bifid hook one vertebral level below the apex on the convex side. The site for the upper convex hook depends on the level of the shoulders, but shoulds, but should always be staggered relative to the upper concave hook. The goal is to establish level shoulders. The more cephalad hook placement, whether convex or concave, will normally elevate the shoulder on the same side. When the shoulders are level initially, determine the best upper convex hook placement based on the deformity. In mild deformities associated with a flexible upper thoracic hook, place the upper convex bifid hook one level below the upper concave hook. But if the left shoulder elevates to an asymmetric high position when distraction is applied to the concave hooks, place the upper convex bifid hook one level above the upper concave hook. When shoulders are level initially, and the primary curve is large and flexible, it is likely that the shoulders will become asymmetric with the left one high when distraction is applied on the concave side. Therefore, place the upper convex bifid hook one level above the upper concave hook. When the concave side shoulder is low, place the upper convex bifid hook one vertebral level below the upper concave hook unless the patient has a large but flexible thoracic scoliosis associated with a large but rigid high thoracic curve (Figure 4). When the concave side shoulder is elevated due to a relatively large and structural upper thoracic curve, a more aggressive strategy is necessary. In some cases, place the upper convex bifid hook two levels rather than one level above the upper concave hook. This will usually allow enough tilting of the upper curve to level the shoulders (Figure 5). When the high thoracic curve is more severe, especially if an anterior release is necessary to establish correction of the major thoracic curve, apply instrumentation more than two levels above the upper concave hook. Usually, it is possible to instrument to T-2, but not to T-1. In these cases, a four-hook construct may be used on the convex side to provide more mechanical stability. Place one bifid hook at the level below that for the upper concave hook and an additional bifid hook as high as possible on the convex side. This will enhance the distractive correction of the high thoracic curve. If an acceptable hook placement is not possible for the upper thoracic curve, use sublaminar wires to provide the necessary tissue fixation of the upper thoracic vertebrae (Figure 6).
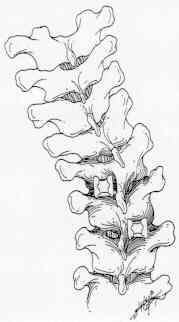
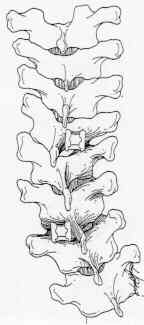
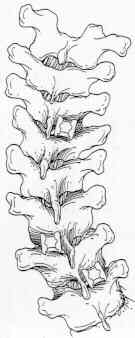
Figure 4 Figure 5 Figure 6 Concave Rod Preparation, Insertion: When all hook sites have been selected, place all hooks except lumbar end concave and lumbar end convex hooks. Position a spinous process wire at the caudal, concave hook site. Place a narrow laminar hook, usually a 10 mm that mimics the Harrington lumbar hook, onto the rod at the caudal end and secure with the Sleeve Locking Instrument. Contour the rod for both sagittal and coronal plane correction. For mild curves (65 degrees or less), bend the rod such that the rod will lie I cm to 2 cm lateral and I cm to 2 cm posterior to the concave apical hook after application of the distraction force. For larger curves, plan for more strain (4 cm to 5 cm) in the coronal plane. The bends will be in a plane approximately 45 degrees to the shoe of the hook. Lordotic contouring of the rods in the upper lumbar spine is not normal practice. Cut the concave rod so it is longer than the length of the deformity. Although the locking sleeves for the remaining two concave hooks can be snapped on at a later stage, it is preferable to slide them onto the rod now. Sleeves that are slid onto the rod will fit snugly. This will facilitate alignment of the open-backed hooks and sleeves. Insert the rod/lumbar hook assembly onto the caudal lumbar vertebral lamina and position the rod so that the upper end lies in the open back of the cephalad concave hook.
(figure 7)